Create a Word Press BLOG page using Post Grid plugin
Why create a BLOG page? • Connect audience to your website • Perfect placement for Search Engine Optimisation • An excellent way to share your page content
On this tutorial we will exercise how to create a Word Press Blog page using Post Grid plugin.
First step go and create a New Page.
1) WP Admin page – Left Menu / Click Pages tab On the Page panel select Add New (top left of page).
2) We will fill some fields here as described below. A) At this point Type ONLY a title for the new page. I will type Blog. B) Publish the page.
Second step will be to create your POST.
1) WP Admin page – Left Menu / Click Posts tab.
2) Add Categories for your posts. • Add a name. • Optional add a Parent Category. • Click Add new Category. Add as many category you need.
3) Now we will go and create a new post. WP Admin page – Left Menu / Click Posts tab. Select Add New Posts (Top left of page).
At this point we are ready to do the setup for our New Post page. A) Type a title for your new post. B) Add the content. C) Select a featured image. D) Select the post format. E) Allocate the post to a category. F) Add Tags for your post. G) Publish OR Save as Draft.
Third step will be to populate the BLOG page with your posts.
To achieve this task we will install and setup the Post Grid plugin. 1) WP Admin page – Left Menu / Click Plugins tab. Select Add new (top left of page). 2) In Search field type: post grid.
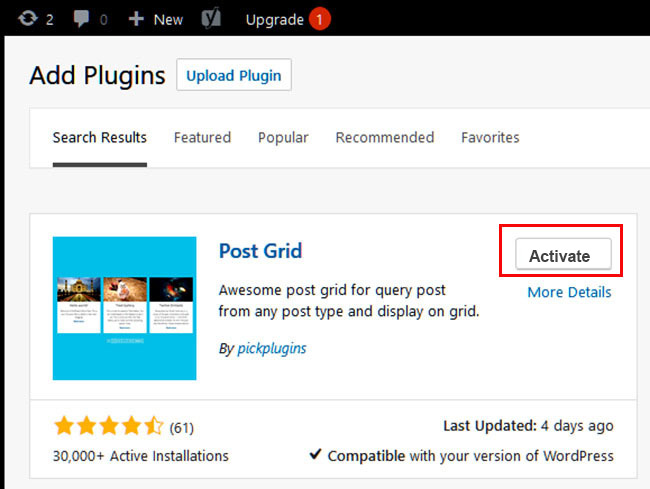
If necessary wait for the page to populate with plugins. Look for Post Grid plugin. Once located go and Install it.
After the plugin will finish to install you will have the option to ACTIVATE it.
4) WP Admin page – Left Menu / Click Posts Grid tab and Select New Post Grid.
A) Type a title for your new post grid. B) The Shortcode has to be added later to the Blog page we created early. C) Click Publish
5) Select Query Post tab. A) Here you can choose the post types (posts, Pages, Media …. ) Want to select more than one Press CTRL + Select. B) Taxonomy & Terms (Categories) This is important because this will be the categories (Post Format) from where your posts will be selected. If you need to select more than one Press CTRL + Select Keys. For basic setup leave the rest as is.
6) In Layout Tab (for basic setup) we will leave all settings as they are.
7) Now pass to Layout settings tab. Read ALL sections and select conform with your desired design.
8) To setup how the posts will be displayed on your Blog page go and Select the Navigation tab. Read ALL sections and select conform with your needs.
At the end do not forget to click the UPDATE tab.
9) Select again the Shortcodes tab and copy the content from the TOP field.
10) WP Admin page – Left Menu / Click Pages tab (see earlier instructions). On the table under the pages title move the mouse OVER the Blog page (or the page you want to edit) and click Edit.
Paste the Shortcode here and go to select Update.
All Done. You can add the Blog page to your menu. Navigate to Blog page and see there a grid with all your selected posts.